
Have you ever run into a bug in Asterisk? If so, don’t despair. Asterisk is software, and despite anyone’s claims to the contrary, all software contains bugs. While you can – and should! – simply file a bug in the Asterisk issue tracker, you may decide that you’d like to try your hand at fixing the bug yourself. That’s the great thing about Open Source software: anyone, at any time, can make any change they’d like.
That being said, fixing a bug in any Open Source project for the first time can be a bit daunting. Where do you start? How do you share your contribution? Luckily, the Asterisk project has a lot of great documentation on this process:
- Patch Contribution Process
- Coding Guidelines used by the project, as well as guidelines for how to properly format commit messages
- How to use Gerrit, the project’s Git repos as well as its code review tool
- The workflow for Code Reviews
- A handy checklist for things to look for in Code Reviews
Unfortunately, the project has err’d on the side of providing comprehensive documentation for this process, which can make it a bit challenging at times to find what you’re looking for – particularly if you’re new at the process. As we’ll see, there’s also a lot to do to fix a bug properly: verifying the bug, testing your patch, writing good commit messages, etc. As such, we’re going to start at ground zero, and demonstrate how to fix a bug in Asterisk and submit the patch for review.
Note: Unfortunately, while we’re going to try to be comprehensive, this series of blog posts can’t show everything. If you are unfamiliar with C, Python, or Asterisk, there’s bound to be some content in here that is confusing and/or challenging. Luckily, the project has dedicated places to discuss all things related to the Asterisk source code – the asterisk-dev mailing list as well as the #asterisk-dev IRC channel on freenode. Feel free to drop in and ask any questions you may have!
The fly in the ointment
The bug we’re going to fix in this blog post is ASTERISK-25179: “CDR(billsec,f) and CDR(duration,f) report incorrect values”. Per the bug report, when the CDR function returns the billsec or duration values for a Call Detail Record, it is returning the value not as a floating point value (as it is documented to do), but instead as some weird super-fraction of a second. That is, if the billsec is 37 seconds, the function is returning 0.037000, as opposed to 37.000. Luckily for us, Gianluca Merlo has done a great job with this bug report, even highlighting where the problem might be in the code (yay). Unfortunately, this is one of those bug reports that can sometimes languish in an Open Source project, even though the feature is clearly broken:
- It only affects users who who use the f flag in the CDR function.
- It doesn’t affect every version of Asterisk – this feature was broken in Asterisk 12+.
- Because it isn’t a crash, deadlock, or some other horrible situation affecting lots of users, the normal project maintainers may not get around to the bug for some time.
As such, this is a great bug to fix for a first time contributor: there’s a clear problem, a clear way to verify that it is fixed, and it’s super helpful to the core maintainers of the project.
Let’s get to it!
Step 1: Get Asterisk
Before we can fix any bugs, we first have to get the source code for Asterisk. The project uses Git for source control, with Gerrit acting as the canonical source for the project, and mirrors on both git.asterisk.org as well as Github. While we could get the source from the mirrored locations, since we’re going to eventually contribute a patch back up to the project, we’re going to want to get the source from Gerrit.
Note: Information about all the Git services the project uses and makes available can be found on the Git Usage page on the Asterisk wiki.
While we could just clone the Asterisk repository out of Gerrit anonymously, as we want to post a patch back to the project for inclusion, we’re going to eventually need an account in Gerrit. Since there’s no time like the present, let’s start with getting an account set up.
Creating an Asterisk Project Account
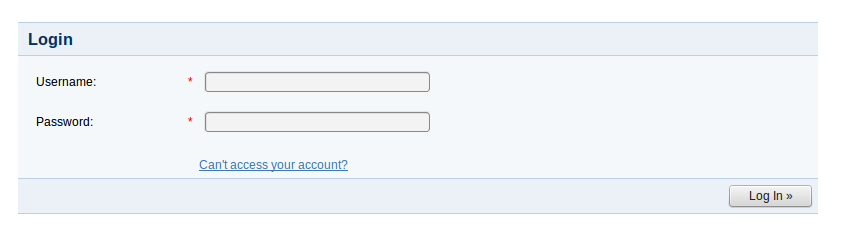
All of the infrastructure used by the Asterisk project uses a single sign-on/account provided by Atlassian Crowd. To create an account, we can go to https://signup.asterisk.org:
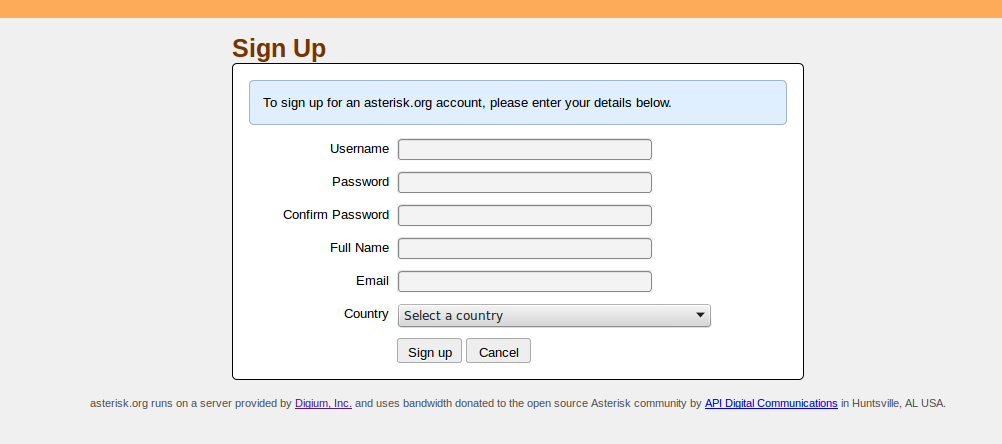
Once we’ve filled all those fields in and selected Sign Up, we should see the following:
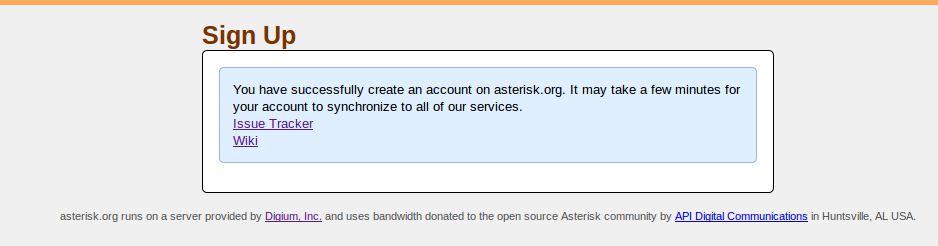
Yay! We have an account. But we aren’t done yet.
Asterisk, like some other open source projects, has a Contributor License Agreement (CLA). Before we can submit a patch to Gerrit, we’ll need to sign that as well. Signing said CLA is actually done in the Asterisk issue tracker, so we can go ahead and click the Issue Tracker link on the Sign Up success page shown above.
Signing a Contributor License Agreement
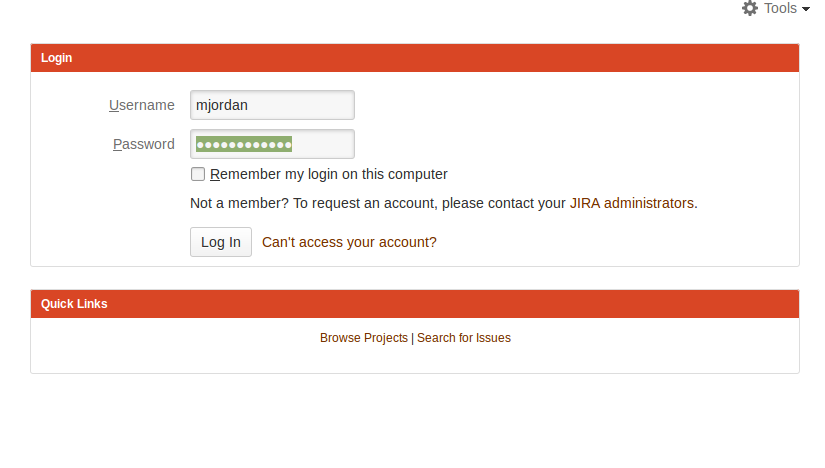
Once we’re at the Asterisk issue tracker, we should go ahead and login. For the purposes of this example, I’ll be signing in using my Username of mjordan, but you should obviously use whatever Username you specified when you created your account.
 Once we’re logged in, we’ll be shown a bunch of dashboards and other interesting information about the project. For now, however, we’re only interested in signing a CLA, which we can do by clicking the big Sign a License Agreement button at the top of the page:

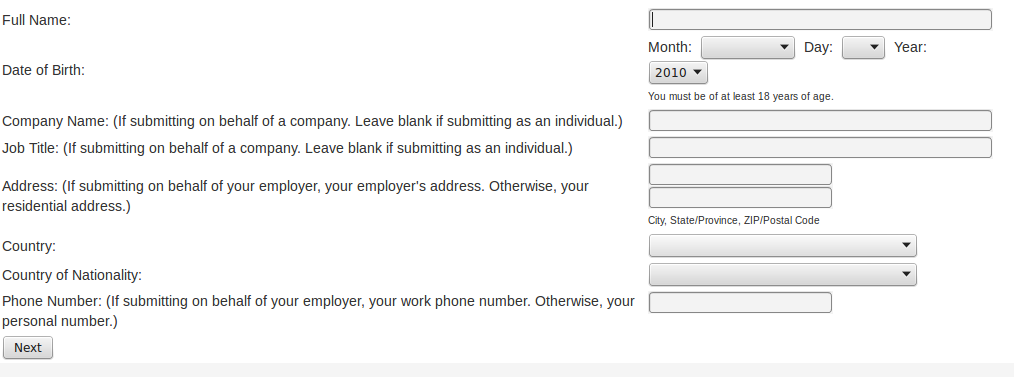
Once we’ve clicked that, we’ll be taken to a page with a legal description of the CLA, as well as the fields we need to fill in.
Note: Do talk to your company before signing any CLA. You should know what you’re signing up for, and what it means. If you aren’t sure, or you want to understand the project’s CLA some more, Digium has posted a few helpful blog posts explaining what the CLA means for contributors.
Once all the fields are filled in, you’ll hit the Next button. That will send your CLA application off to our lovely attorney, Michelle, who makes sure that all the i’s are dotted and t’s crossed. When it’s been approved, you’ll receive an e-mail, and your account will automatically be marked as a “licensed” contributor. That will then allow you to log into Gerrit.
Creating an Account in Gerrit
Once we’re licensed, we need to create an account in Gerrit so that we can upload patches and participate in code reviews. To do that, we can head over to https://gerrit.asterisk.org and click the Sign In link:

That will redirect us to a new login screen using Atlassian Crowd OpenID. There, we should enter in our standard Asterisk project Username and Password, and click Log In.
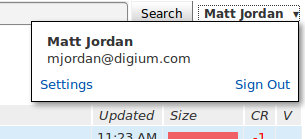
That will redirect us back to Gerrit, which should now show us as signed in:

From there, we need to do two more steps to set up our account: provide Gerrit our user name (which it strangely can’t infer from the OpenID login) and our SSH key for Git. To do that, click the small down arrow next to your name, and select Settings:
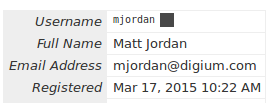
On the Settings page, you need to first provide a Username. We highly suggest that you use the same Username as your Atlassian/Asterisk project account, as that makes things a lot easier. In my case, that’s ‘mjordan’:
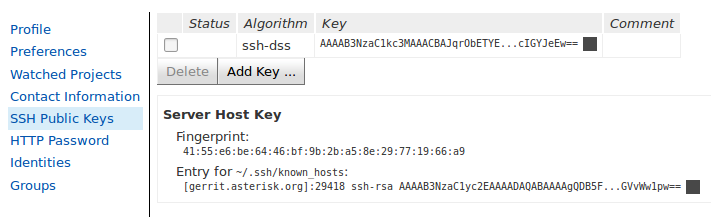
Finally, you’ll need to add an SSH key. Click SSH Public Keys, and then Add Key. That should provide you a textbox to paste your SSH public key into. Click Add when the public key has been pasted into the textbox. If you got it all correct, you should see something like the following:
And with that, all of our accounts are set up!
Cloning Asterisk
With all of our accounts properly set up, we can now clone Asterisk out of Gerrit as a contributor. Pick a nice working directory somewhere on your system, and clone Asterisk from Gerrit:
$ git clone ssh://gerrit.asterisk.org:29418/asterisk asterisk

Cloning into 'asterisk'...
remote: Counting objects: 473835, done
remote: Finding sources: 100% (473835/473835)
remote: Total 473835 (delta 379376), reused 469347 (delta 379376)
Receiving objects: 100% (473835/473835), 247.68 MiB | 7.98 MiB/s, done.
Resolving deltas: 100% (379376/379376), done.
Checking connectivity... done.
Note: this will take awhile. The Asterisk project has a loooooooooooooooong history.
Once it’s done, we’re ready to get Asterisk built and installed!
Step 2: Build, compile, and install
First, let’s get some dependencies that Asterisk needs installed. Since our bug is in Asterisk 12+, we need to get the dependencies installed for the currently supported versions of Asterisk. As of the time this blog post was written, that’s Asterisk 11 and Asterisk 13, so we need to at least make sure that Asterisk 13 has all of its dependencies.
While there’s some scripts that do that for us that come with Asterisk, they have a tendency to install the kitchen sink. Since I don’t really need every database driver that Asterisk supports, I’m going to go ahead and install just what I need to have Asterisk build for most common situations.
Note: I’m running Linux Mint, so the packages that will be installed will assume that you’re using a Debian based system. If you’re not, feel free to install your distro’s equivalents.
$ apt-get install automake gcc gcc-c++ ccache ncurses-devel openssl-devel libxml2-devel sqlite-devel libuuid-devel libedit-devel libxslt-devel
Asterisk 13 will also need libjansson , which provides JSON support. Some distros have this packaged; others do not. I’ll assume we may need to build that from source, which we can do as shown below:
$ wget http://www.digip.org/jansson/releases/jansson-2.4.tar.gz
$ tar -zxvf jansson-2.4.tar.gz
$ cd jansson-2.4
jansson-2.4 $ ./configure && make all
jansson-2.4 $ sudo make install
libjansson installs by default into /usr/local/lib , so you may need to tell ldconfig how to go find it:
$ sudo echo "usr/local/lib" >> /etc/ld.so.conf.d/usr_local.conf
$ sudo ldconfig
Lastly, we’ll install pjproject . We don’t really need a SIP channel driver to fix this CDR bug, but it’s almost a certainty that we’ll want one eventually, and I’m personally a much bigger fan of the new PJSIP stack than I am of the legacy chan_sip channel driver. So let’s get that installed as well:
$ wget https://github.com/asterisk/pjproject/archive/pjproject-2.4.tar.gz
$ tar -zxvf pjproject-2.4.tar.gz
$ cd pjproject-pjproject-2.4
pjproject-pjproject-2.4 $ ./aconfigure CFLAGS="-g -O2 -DNDEBUG -DPJ_HAS_IPV6=1 -DPJSIP_MAX_PKT_LEN=12288" --enable-shared --prefix=/usr
pjproject-pjproject-2.4 $ make dep && make
pjproject-pjproject-2.4 $ sudo make install
Note that we’ve given PJSIP a few directives here:
- We’ve told it to disable its assertions. PJSIP is a bit liberal in its assertions, and sometimes we’d rather just have Asterisk handle those conditions. This will also help with some of Asterisk’s other build options, which treat assertions as a rather fatal event.
- We’ve told PJSIP to enable IPv6.
- We’ve told PJSIP to bump the default SIP maximum packet length. That will let us handle more modern SIP requests.
- We’ve told PJSIP to build shared objects. Asterisk doesn’t link statically to PJSIP; it only links dynamically.
Once installed, it’s time to configure Asterisk. Before we do that, however, we should checkout a branch for the bug fix we’re going to work on, and base it on the appropriate upstream branch. In the Asterisk project, bugs are usually fixed in the oldest supported version that has that bug, which in our case, is Asterisk 13. That means we need to make a branch off of origin/13 :
$ cd asterisk
asterisk $ git checkout -b ASTERISK-25179 -t origin/13
Branch ASTERISK-25179 set up to track remote branch 13 from origin.
Switched to a new branch 'ASTERISK-25179
Once we’re in our branch, we can configure Asterisk:
asterisk $ ./configure --enable-dev-mode --with-pjproject
Note that we’re passing two special parameters to configure as well: one that specifies that we want Asterisk to be configured in development mode, another that says not to build unless we find PJSIP. The first is pretty important. When configured in development mode, a number of new compilation options that enable unit and functional testing will be enabled, and compiler warnings will be treated as errors. The Continuous Integration systems always build Asterisk at least one time in development mode, and will fail patches that don’t compile. When contributing, always build Asterisk in development mode!
Once Asterisk has finished configuring, we’ll be greeted with the following:
configure: Menuselect build configuration successfully completed

               .$$$$$$$$$$$$$$$=..
            .$7$7..          .7$$7:.
          .$$:.                 ,$7.7
        .$7.     7$$$$           .$$77
     ..$$.       $$$$$            .$$$7
    ..7$   .?.   $$$$$   .?.       7$$$.
   $.$.   .$$$7. $$$$7 .7$$$.      .$$$.
 .777.   .$$$$$$77$$$77$$$$$7.      $$$,
 $$$~      .7$$$$$$$$$$$$$7.       .$$$.
.$$7          .7$$$$$$$7:          ?$$$.
$$$          ?7$$$$$$$$$$I        .$$$7
$$$       .7$$$$$$$$$$$$$$$$      :$$$.
$$$       $$$$$$7$$$$$$$$$$$$    .$$$.
$$$        $$$   7$$$7  .$$$    .$$$.
$$$$             $$$$7         .$$$.
7$$$7            7$$$$        7$$$
 $$$$$                        $$$
  $$$$7.                       $$  (TM)
   $$$$$$$.           .7$$$$$$  $$
     $$$$$$$$$$$$7$$$$$$$$$.$$$$$$
       $$$$$$$$$$$$$$$$.

configure: Package configured for:
configure: OS type  : linux-gnu
configure: Host CPU : x86_64
configure: build-cpu:vendor:os: x86_64 : unknown : linux-gnu :
configure: host-cpu:vendor:os: x86_64 : unknown : linux-gnu :
We can now pick our more advanced build options. To do that, we’ll use menuselect:
asterisk $ make menuselect
This will run the menuselect tool:

Select Compiler Flags – Development. In the Compiler Flags – Development list of compilation options, select the following:
- DONT_OPTIMIZE – this will turn off optimizations, which makes it possible to get useful backtraces in the event of a crash.
- BETTER_BACKTRACES – if available, select this. This will make our crash backtraces even more useful.
- DO_CRASH – treat assertions as a fatal crash. If we assert, we want a backtrace so we can fix it. (Note: this is why we disable PJSIP assertions. An assertion in PJSIP is often an expected and manageable error in Asterisk. Assertions at the Asterisk level are more serious.)
- TEST_FRAMEWORK – enables the unit tests and functional test drivers.
Hit Esc, then select Test Modules. In the Test Modules list of options, select all unit tests that can be enabled. Some unit tests may require dependencies you don’t have installed – that’s okay. At a minimum, we definitely need the CDR unit tests provided by test_cdr , as we’ll be fixing a CDR related bug.
Hit Esc to go back to the main menu, then hit Esc again. We’ll be prompted to save our changes:

Hit S to save the changes and exit menuselect.
Now we can build Asterisk:
asterisk $ make
...
Building Documentation For: channels pbx apps codecs formats cdr cel bridges funcs tests main res addons
/usr/bin/xmllint --dtdvalid doc/appdocsxml.dtd --noout doc/core-en_US.xml
 +--------- Asterisk Build Complete ---------+
 + Asterisk has successfully been built, and +
 + can be installed by running:              +
 +                                           +
 +                make install               +
 +-------------------------------------------+
Install Asterisk:
asterisk $ sudo make install

make -C sounds install
make[1]: Entering directory `/home/mjordan/projects/asterisk-test/sounds'
make[1]: Leaving directory `/home/mjordan/projects/asterisk-test/sounds'
find rest-api -name "*.json" | while read x; do
		/usr/bin/install -c -m 644 $x "/var/lib/asterisk/rest-api" ;
	done
 +---- Asterisk Installation Complete -------+
 +                                           +
 +    YOU MUST READ THE SECURITY DOCUMENT    +
 +                                           +
 + Asterisk has successfully been installed. +
 + If you would like to install the sample   +
 + configuration files (overwriting any      +
 + existing config files), run:              +
 +                                           +
 + For generic reference documentation:      +
 +    make samples                           +
 +                                           +
 + For a sample basic PBX:                   +
 +    make basic-pbx                         +
 +                                           +
 +                                           +
 +-----------------  or ---------------------+
 +                                           +
 + You can go ahead and install the asterisk +
 + program documentation now or later run:   +
 +                                           +
 +               make progdocs               +
 +                                           +
 + **Note** This requires that you have      +
 + doxygen installed on your local system    +
 +-------------------------------------------+
And install the sample configuration files:
asterisk $ sudo make samples

...
Installing file configs/samples/xmpp.conf.sample
Updating asterisk.conf
/usr/bin/install -c -d "/var/spool/asterisk/voicemail/default/1234/INBOX"
build_tools/make_sample_voicemail "//var/lib/asterisk" "//var/spool/asterisk"
Installing file phoneprov/000000000000.cfg
Installing file phoneprov/000000000000-directory.xml
Installing file phoneprov/000000000000-phone.cfg
Installing file phoneprov/polycom_line.xml
Installing file phoneprov/polycom.xml
Installing file phoneprov/snom-mac.xml

asterisk $
If everything worked appropriately, we should now be able to start Asterisk:
asterisk $ sudo asterisk -cvvvg
...
Asterisk Ready.
*CLI>
Note: Did I just run Asterisk as an elevated user? Yes. Yes I did. That’s a big security no-no. I’m assuming you’re doing this all on a local, safe, secured development machine; don’t do this on a production system. Similarly, for the sake of convenience, I’ll be running other items with ‘sudo’. If you want to go ahead and set up a user/group for Asterisk, please do so – in which case, ignore the ‘sudo’ that shows up here and there in this and later blog posts.
Step 3: Run unit tests
First, it’s a good idea to make sure that all the unit tests pass on your system. The last thing you want to do is to make a change in the code, break some existing test, and have your patch get rejected late in the review process. To start, however, we’re going to need to tweak a few of Asterisk’s configuration files. A few tests require Asterisk’s HTTP server and Manager Interface (AMI) to be enabled. We can enable both of these subsystems in http.conf and manager.conf , respectively.
Note: It would be far better if the tests that used AMI or the HTTP server bothered to detect if those subsystems were enabled before running. That’d be a nice patch for someone to write …
Exit Asterisk (core stop gracefully ) and edit the configuration files, as shown below:
asterisk $ sudo vim /etc/asterisk/http.conf

...

[general]
;
; The name of the server, advertised in both the Server field in HTTP
; response message headers, as well as the <address /> element in certain HTTP
; response message bodies. If not furnished here, "Asterisk/{version}" will be
; used as a default value for the Server header field and the <address />
; element. Setting this property to a blank value will result in the omission
; of the Server header field from HTTP response message headers and the
; <address /> element from HTTP response message bodies.
;
servername=Asterisk
;
; Whether HTTP/HTTPS interface is enabled or not.  Default is no.
; This also affects manager/rawman/mxml access (see manager.conf)
;
enabled=yes
;
; Address to bind to, both for HTTP and HTTPS. You MUST specify
; a bindaddr in order for the HTTP server to run. There is no
; default value.
;
bindaddr=127.0.0.1
asterisk $ sudo vim /etc/asterisk/manager.conf

...

;
; AMI - The Asterisk Manager Interface
;
; Third party application call management support and PBX event supervision
;
; Use the "manager show commands" at the CLI to list available manager commands
; and their authorization levels.
;
; "manager show command <command>" will show a help text.
;
; ---------------------------- SECURITY NOTE -------------------------------
; Note that you should not enable the AMI on a public IP address. If needed,
; block this TCP port with iptables (or another FW software) and reach it
; with IPsec, SSH, or SSL vpn tunnel. You can also make the manager
; interface available over http/https if Asterisk's http server is enabled in
; http.conf and if both "enabled" and "webenabled" are set to yes in
; this file. Both default to no. httptimeout provides the maximum
; timeout in seconds before a web based session is discarded. The
; default is 60 seconds.
;
[general]
enabled = yes
;webenabled = yes

port = 5038
bindaddr = 0.0.0.0
Finally, one test that covers out of call message handling tries to test what happens if there isn’t a dialplan location to send the message into. Unfortunately, Asterisk tries to dump that message into extension s of context default , which the default extensions.conf provides for us. Hilarity ensues when we try to play a sound file back over the Message channel driver. In order to work around that, we’ll provide a blank extensions.conf – which is better than having an extensions.conf full of stuff we don’t want.
asterisk $ echo "[general]" | sudo tee /etc/asterisk/extensions.conf
Note: A make target that provided all of the Asterisk configuration files needed to run the unit tests would also be a good idea. I’ll admit that it’s kind of sad that I don’t realize these things until I’m writing blog posts.
Once that’s done, we can start Asterisk back up again:
asterisk $ sudo asterisk -cvvvg
Once we’re back in Asterisk, we can look at all of the registered unit tests from the Asterisk CLI:
*CLI> test show registered all

...
/stasis/endpoints/        cache_clear                    Test endpoint state change messages      NOT RUN
/stasis/endpoints/        state_changes                  Test endpoint updates as its state chang NOT RUN
/stasis/res/              app_invoke_dne                 Test stasis app invocation.              NOT RUN
/stasis/res/              app_invoke_one                 Test stasis app invocation.              NOT RUN
/stasis/res/              app_replaced                   Test stasis app invocation.              NOT RUN
--------                  ----                           -------                                  -----------

510 Registered Tests Matched
To run all of the tests, execute the test execute all CLI command:
*CLI> test execute all
...
Note that when running tests, you’ll often see plenty of ERROR or WARNING messages fly by. That’s okay. Unit tests tend to test off nominal conditions and – sometimes – play a little fast and loose with what constitutes an Asterisk channel. When all of the tests are done executing we should get presented with how many passed/failed, which is what we really want to see. You may have a different number of unit tests registered than what is shown below, but all of them should pass:
...

END /stasis/res/ - app_replaced Time: <1ms Result: PASS

510 Test(s) Executed 510 Passed 0 Failed
*CLI>
With all the unit tests running, we can now proceed to fixing this noxious little bug, right? Right?
Not quite.
First, we can inspect the unit tests that cover CDRs by running test show registered category /main/cdr/, which should show something close to the following:
*CLI> test show registered category /main/cdr/
Category                  Name                           Summary                                  Test Result
--------                  ----                           -------                                  -----------
/main/cdr/                test_cdr_fork_cdr              Test field access CDRs                   PASS
/main/cdr/                test_cdr_no_reset_cdr          Test field access CDRs                   PASS
/main/cdr/                test_cdr_fields                Test field access CDRs                   PASS
/main/cdr/                test_cdr_park                  Test cdrs for a single party entering Pa PASS
/main/cdr/                test_cdr_dial_answer_multipart Test dialing, answering, and going into  PASS
/main/cdr/                test_cdr_dial_answer_twoparty_ Test dialing, answering, and going into  PASS
/main/cdr/                test_cdr_dial_answer_twoparty_ Test dialing, answering, and going into  PASS
/main/cdr/                test_cdr_dial_answer_no_bridge Test dialing, answering, and not going i PASS
/main/cdr/                test_cdr_dial_parallel_failed  Test a parallel dial where all channels  PASS
/main/cdr/                test_cdr_dial_caller_cancel    Test CDRs for a dial where the caller ca PASS
/main/cdr/                test_cdr_dial_unavailable      Test CDRs for a dial that results in una PASS
/main/cdr/                test_cdr_dial_busy             Test CDRs for a dial that results in a b PASS
/main/cdr/                test_cdr_dial_congestion       Test CDRs for a dial that results in con PASS
/main/cdr/                test_cdr_dial_unanswered       Test CDRs for a dial that isn't answered PASS
/main/cdr/                test_cdr_outbound_bridged_call Test dialing, answering, and going into  PASS
/main/cdr/                test_cdr_single_multiparty_bri Test cdrs for a single party entering/le PASS
/main/cdr/                test_cdr_single_twoparty_bridg Test cdrs for a single party entering/le PASS
/main/cdr/                test_cdr_single_twoparty_bridg Test cdrs for a single party entering/le PASS
/main/cdr/                test_cdr_single_bridge_continu Test cdrs for a single party entering/le PASS
/main/cdr/                test_cdr_single_bridge         Test cdrs for a single party entering/le PASS
/main/cdr/                test_cdr_single_party          Test cdrs for a single party             PASS
/main/cdr/                test_cdr_unanswered_outbound_c Test outbound unanswered calls           PASS
/main/cdr/                test_cdr_unanswered_inbound_ca Test inbound unanswered calls            PASS
/main/cdr/                test_cdr_channel_creation      Test that a CDR is created when a channe PASS
--------                  ----                           -------                                  -----------

24 Registered Tests Matched
Remember that our bug was actually occurring in the CDR dialplan function – specifically, in an option it provides for interpreting the duration and billsec attributes. For the most part, our CDR unit tests only cover the CDR core. Now, we might get lucky and our bug might be in the core, but it’s far more likely to be in the dialplan function itself. Currently, we don’t have any unit tests that cover the CDR dialplan function. That leaves us with two options:
- Write a new unit test module that covers the CDR dialplan function.
- Look at the Asterisk Test Suite to see if it has any CDR dialplan function tests.
As fun as writing unit tests in C is, it’s often much more efficient to test dialplan functionality using a higher level language, like Python. As such, I’ll bet you know where I’m headed with this… next time: to the Asterisk Test Suite!

One Response